The Stiz Media, LLC

Making your website work for you

  • Styles for Genesis
    • FAQs
  • Cart
  • My Account
  • Home
  • Web Design
  • Portfolio
  • Resources
  • Blog
  • Contact

Powerful websites, with style.

Home » Blog » Connect Coda 2 MySQL with SiteGround databases

Connect Coda 2 MySQL with SiteGround databases

January 28, 2014 Andhi 4 Comments

Coda 2 Homepage

This morning I had to do some heavier editing of database tables, so I wanted to take the opportunity to test the MySQL editor that’s built in to Coda 2.

It’s actually really simple, you just need to know exactly what to input into each field, and where to find that info.

First off… if you don’t use SiteGround (aff), I consider it the best bang for hosting WordPress websites.

SiteGround Settings and Setup

Step 1:

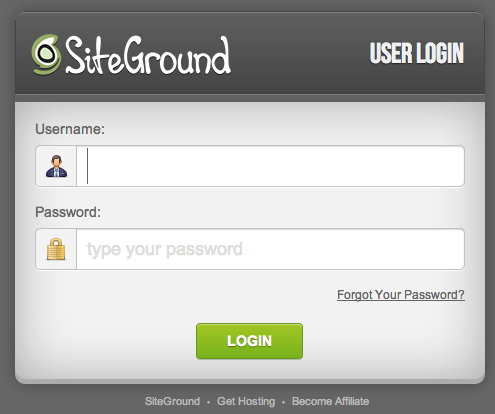
Login to your SiteGround account

Siteground Login

Step 2:

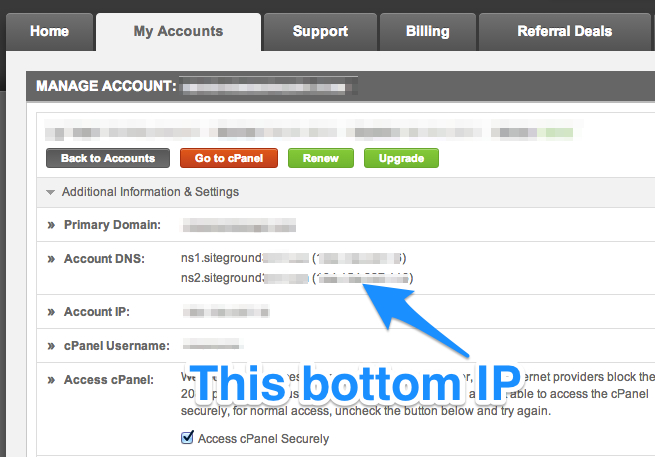
Go to “My Accounts” then “Manage Account”

If you have more than 1 account, you’ll want to choose the account for which you want to setup in Coda 2. You’ll have to repeat these steps for each account you want access to.

Step 3:

Under “Account DNS” you need to copy the IP address that’s after ns2.sitegroundXXX.com

Siteground ns2 IP

Step 4:

Click “Go to cPanel”

Step 5:

Under the “Databases” section choose “Remote MySQL”

Step 6:

In the “Host” field, paste the IP address from Step 3, and click “Add Host”

Coda 2 Settings and Setup

Step 7:

Add new site, or choose the site you want access MySQL in.

Step 8:

Set “Database Type:  MySQL Server”

Step 9:

Server: Paste the IP address used in Steps 3 and 6

Step 10:

User Name and Password: Copy and paste the username and password associated with the database you want to access.

(Tip: You only need to use the settings for 1 database. After you’re in, Coda will give you quick access to all of the db’s in your SiteGround account)

Step 11:

Initial Database: Paste the exact name of the initial database you want to access. Make sure the username and password above are already users of this database.
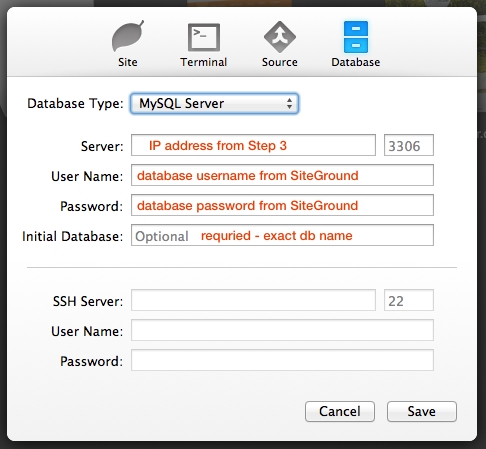
Coda Database Settings

Step 12:

Save and connect!

Once you’re in, add a new MySQL document and use the dropdown on the top left to choose which database you want to connect to.  So far, I’m loving using Coda much more than PHPMyAdmin!

Related Posts

  • Remove Avatar
    Remove Avatar from Genesis Author Box
  • A really organized life
    Genesis Page Templates in a subdirectory
  • Genesis Author Box Widget Area
    Add a Widget Area to Genesis Author Box

Tutorials Coda 2, SiteGround

‹ Why I love Easy Digital Downloads, HINT – it’s not just because it works well
How to customize any Genesis child theme without code ›

Try The Most Powerful Genesis Child Theme Ever Created

Mai Theme is the most customizable Genesis child theme (and plugin!) available. Check it out now!

Learn More @ MaiTheme.com

Our posts, directly to your inbox

Comments

  1. Wahab Riaz says

    October 1, 2015 at 6:19 am

    Thanks for your priceless guidance. The knowledge you shared here is well detailed.

    Reply
    • JiveDig says

      October 2, 2015 at 9:37 am

      Thanks for stopping by!

      Reply

Leave a Reply Cancel reply

Your email address will not be published. Required fields are marked *

Our posts, directly to your inbox


Howdy, I'm Mike Hemberger. I like to build nice websites and web apps with WordPress and Genesis Framework.

I'm passionate about everything I do, and it resonates in all of my work.

Feel free to email, and you'll be speaking directly with me.

Recent Posts

Restful P2P Example

Create Posts 2 Posts ‘connections’ with the WordPress Rest API

EA Share Count SMS button

Add SMS share button to EA Share Count plugin

ACF Extras

ACF Extras officially launched! A community of code snippets and field groups

Remove Items from TinyMCE editor

Remove Buttons/Items From The WordPress TinyMCE Editor

  • My Account
  • Affiliate Area
  • Log In|Log Out
  • GitHub
  • Instagram
  • Twitter
  • YouTube

Copyright © 2025 · The Stiz Media, LLC · All Rights Reserved