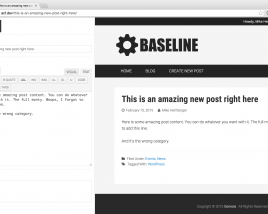
It’s not very hidden… I’m a huge fan of “FEATT” (front end all the things). Yes, that’s an acronym I just made up right now, but I might just continue to use it. I love building websites that keep the users on the front end for posting & editing new posts, editing profiles, and more. Sometimes that’s not feasible for the type of site you’re working on, but many times it is, especially with some of the tools available now that make things easier for us to setup. Enter Caldera Forms.
This tutorial walks you through a clean (and safe) setup for front end posting and editing with a Caldera Form.
Before getting into the details, let me mention some of the limitations of Caldera Forms that I’ve come across in working with front end posting and editing. At the time of writing this post Caldera Forms is at version 1.3.02 and the Caldera Custom Fields add-on is at 2.0.3.
The current limitations
No WYSIWYG Editor – This is kind of a big one. This means that the post content you are posting/editing will only have a text area field. No TinyMCE with image upload. No simple method for bold, italic, headings,etc. I’m sure this may get added in the future, but for now it’s not available. I saw somewhere that a WYSIWYG field add-on was made, on Github, but not fully tested. I’m not comfortable using it on a production site so I didn’t test it for this write up.
No Featured Image when editing a post – The current implementation for front end posting and adding a featured image is pretty smooth. It works great. The issue is when editing a post you don’t see the currently uploaded featured image in the file upload field. That means you have to reset it each time you edit the post. Not fun. There’s a nice filter to add the current featured image as the default for the field, but even doing this won’t show the actual image, just the file name in the field.
Taxonomies/Categories/Tags – There’s very limited native support for taxonomies when posting/editing posts in Caldera Forms. It’s easy to auto-populate a field with term names, but it requires lots of extra work/code to save the terms, especially when trying to use the same form for new posts and editing existing posts.
The fun part – Let’s Build A Form!
Make sure you have Caldera Forms and Caldera Custom Fields installed.
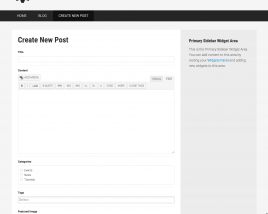
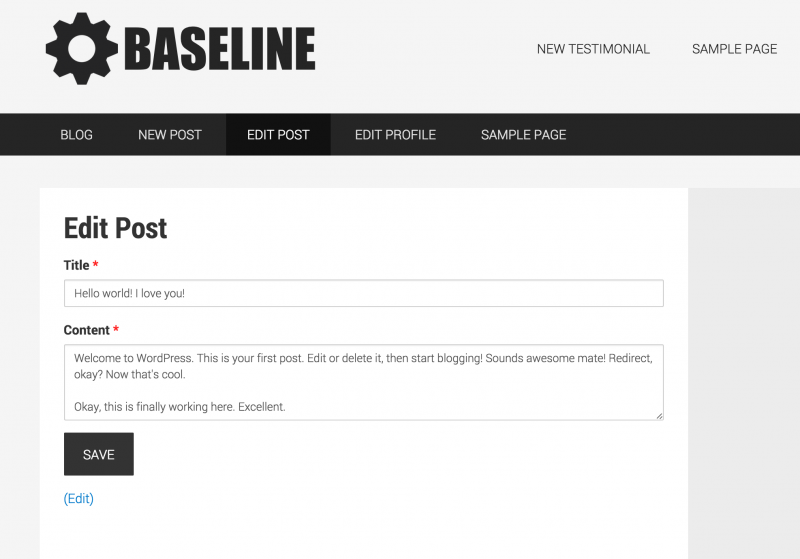
Let’s create a simple form with 4 total elements.
- Title – Single Line Text field
- Content – Paragraph Text field
- Save – Submit button field
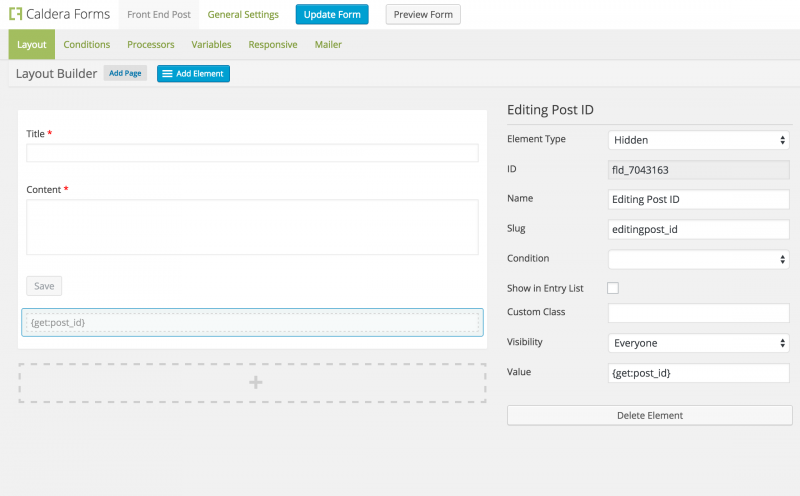
- Editing Post ID – Hidden field to $_GET the post ID we want to edit
The first 3 are pretty obvious, I’ll leave them to you. The hidden field is tricky. We’re going to be adding a link on each existing post that adds a link to the edit post form with a query arg that includes the post ID. This is pretty basic, but we need some custom code (custom shortcode) that does some safety checks to make sure the logged in user is the author of the post they are trying to edit.
Form Processors
Just over to the Processors tab in Caldera Forms.
Save as Post Type processor
- Click the “Add Processor” button and choose “Custom Fields: Save as Post Type”
- Set your post type and post status (publish, draft, {custom status here}, etc)
- Set Post ID to “{get:post_id}” without the quotes
- Set your Title/Content fields
The {get:*} magic tag allows Caldera Forms to use a specific query arg value to process the form. Our code later on will add the post_id query arg/value for the form to process.
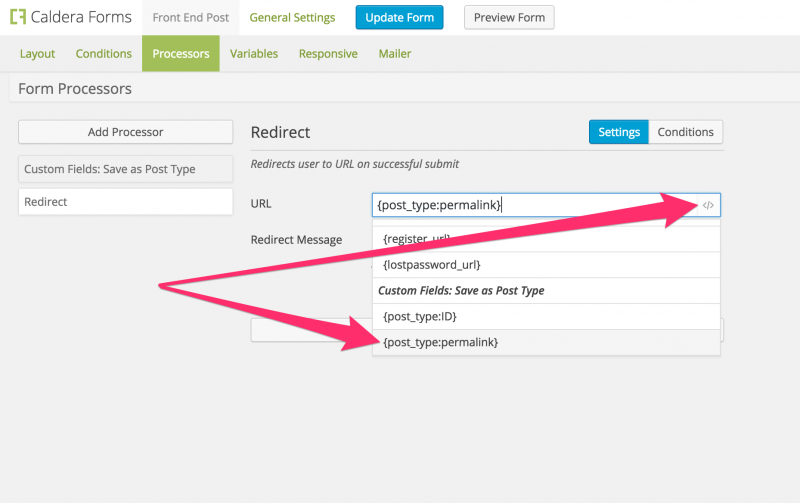
Redirect processor
- Click the “Add Processor” button and choose “Redirect”
- Set URL to “{post_type:permalink}” without the quotes
- Set Redirect Message to whatever you want. We won’t be using this here since we’re not going to save with Ajax
At this point, it may be smart to save the form if you haven’t already. 😉
Form General Settings
At the top of the Caldera form dashboard, let’s edit the General Settings. The most important settings here are making sure we don’t save via Ajax and making sure we’re not saving (form) entries.
- Name the form “Edit Post”. You can change this, but you’ll have to alter the code below with your new name.
- Set “Capture Entries” to “Disabled”
- Make sure “Ajax Submissions” is unchecked. We want to force a page reload after saving so our redirect processor fires during that process. It will work with Ajax, but you’ll get an unnecessary flash on the page after ajax is done processing. This is not necessary since will be redirecting/reloading a page anyway.
Even More Fun – Let’s Code
First, create a WordPress page called “Edit Post”. You can change the name later, but you’ll have to change the code below as well.
Custom Shortcode
We need to write some code to make the experience much smoother and safer.
Let’s create a shortcode to display the form. We could just use the Caldera shortcode, but we want to do some custom checking to make sure the currently logged in user is the author of the post they are trying to edit.
This following code creates an [edit_post] shortcode we can put on any page.
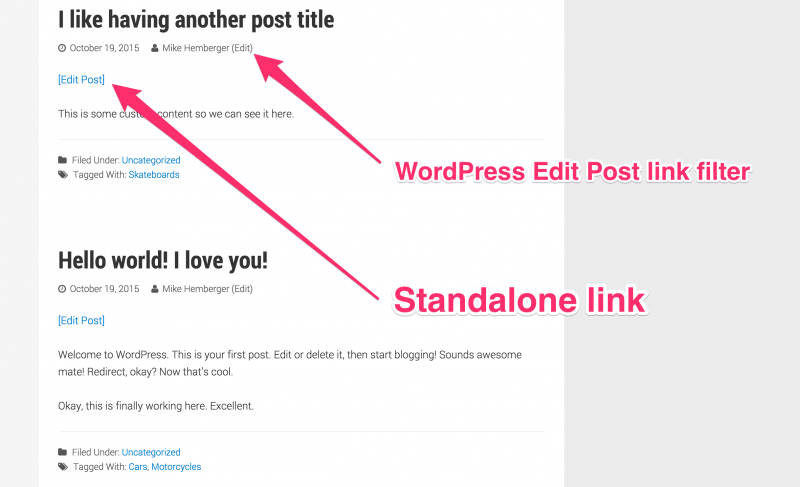
Custom ‘Edit Post’ link(s)
I’m giving you 2 different options for adding these front end edit post links. The first is a standalone link before the post content, the second is a filter on the native WordPress edit link. They both work fine, it’s just a preference which you like better.
Standalone Edit Post link
I started with a nice helper function to check if the currently logged in user is the author of the post we’re trying to edit.
Now, our filter on the_content to display the edit post link before our content post’s content.
This filter adds a custom ‘Edit Post’ link on posts the logged in user has authored. The link also adds ?post_id=123 query arg to the end of the /edit-post/ page URL. This is the post ID that allows the form to know which post to edit.
I also made this function really easy to add your own custom post types as well. If your form is meant to edit a custom post type, just use that post type name in place of the ones in the current array below.
WordPress Edit Post link filter
This filter adds the same link as the above code, but uses the default WP edit posts link (displayed in different locations in different themes, if displayed at all). This filter also alters the WP toolbar Edit Post link.
Once you decide on one of these methods, you will see a link on archives and single posts for the post types you’ve set.
Add shortcode to your page
The last step is to add our custom [edit_post] shortcode to the ‘Edit Post’ page.
That’s it, edit your posts on the front end!
That’s all there is too it. Authors will now be able to edit their posts on the front end, and access will be restricted if they try to edit other posts, or if a none author tries to do anything tricky.
Let me know in the comments how it works for you…